
There are a bunch of references for building them. First thing I did was find a supply laying around I could use. You can reference the diagram below for the color coding of the ATX supplies.
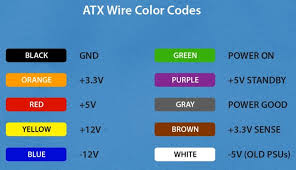
The same color lines should be soldered together for wiring the supply to get the max amount of current the supply can provide. Once you get the ground and voltage wires together you are a left with a few others. My supply did not have a -5 V. The BROWN wire is the +3.3V sense with needs to be tied in with the +3.3V line. The GREEN wire is soldered to the switch on my supply. The PURPLE wire attaches to the red LED and the GRAY wire attaches to the green LED.
The schematic would be as follows. I did not utilize the fuses in line. The resistors are required for the LEDs and I bought a round switch. Wiring for all other components is correct. I used 2 5 Watt resistors in series in place of the one 10 Watt. Some supplies require an initial load in order to turn on.

I had difficulty using binder posts with the amount of ground wires my supply had. I decided to not utilize all of them as most of the things I will use my supply for do not draw a significant amount of current.
I used a project box from Radioshack and layed out what I wanted my box to look like.

I cut the project box out using a template and installed all the components. I soldered all the wires to the appropriate place and still need to create labels. It is important to heat shrink all the wires so the do not contact at any mount.
The red led will turn on when the ATX supply is plugged in. The green led will signify the switch is turned on, supplying power to the rails. Everything worked great and I was very pleased with how everything turned out.

Reference to links I used can be found below: